Beginner guide to WordPress backups and restore strategies
Build a simple backup plan that actually restores
WordPress backups are your safety net when something suddenly goes wrong with your site. A good backup and restore strategy makes it possible to recover quickly from hacks, bad updates, or hosting failures without starting from scratch.
In this beginner friendly guide, you will plan a simple backup schedule, set up an easy plugin based solution, and practice restoring WordPress so you feel confident that your backups actually work when you need them.
What You Need to Start
- Access to your WordPress Admin dashboard with an Administrator user.
- Access to your hosting control panel (such as cPanel or Plesk) or SFTP login details.
- Enough free storage on your hosting account and in a cloud service such as Google Drive or Dropbox.
- Basic understanding of logging in to WordPress and installing plugins.
- At least 30–60 minutes of uninterrupted time to walk through the setup and first test restore.
Step 1: Understand How WordPress Backups Work
Before you configure any tools, understand exactly what a backup must contain and where it should be stored. This prevents false confidence from incomplete or unusable backups.
- Write down that a complete WordPress backup must include both your files (themes, plugins, uploads, core files) and your database (posts, pages, users, settings).
- Log in to your hosting panel and open the File Manager to view your WordPress folder, usually named public_html or your domain name.
- Locate the wp-content folder and the wp-config.php file so you know where your important data lives.
- In your hosting panel, open phpMyAdmin or your database tool and confirm you can see your WordPress tables starting with wp_ (or a custom prefix).
- Read through the basics of WordPress documentation to get familiar with how WordPress stores content.
You know this step is complete when you can confidently point to where your files and database live, and you understand that a real backup must include both.
Step 2: Plan Your WordPress Backup Strategy
A backup is only useful if it is recent, stored safely, and easy to restore. Plan your strategy before you turn on any schedules so your backups match how your site is used.
- Decide how often your site changes. If you publish or get orders daily, set backups to run at least once per day. Weekly or monthly publishing can use a less frequent schedule.
- Choose how many copies you want to keep, such as 7 daily backups and 4 weekly backups, based on your storage limits.
- Decide where to store backups. Plan to keep at least one copy offsite in cloud storage separate from your web host.
- Write down a simple 3-2-1 rule for your site: at least 3 backups, 2 different locations, 1 copy offsite.
- Open a notes app or document and draft a short written plan using WordPress backup strategy as a reference.
You know your strategy is ready when you can clearly answer how often you back up, where the backups live, and how long you keep them.
Step 3: Install a Beginner Friendly Backup Plugin
Backup plugins make it easy to schedule backups and send them to offsite storage without touching database tools. You will now install a reliable backup plugin using the WordPress plugin directory.
- Log in to your WordPress dashboard and go to Plugins » Add New.
- Use the search box and type a trusted backup plugin name such as UpdraftPlus, BackWPup, or another plugin recommended in How to choose the best WordPress hosting.
- Check that the plugin shows many active installs, recent updates, and good ratings.
- Click Install Now, then click Activate once the installation completes.
- Confirm that a new menu item appears under Settings or in the main sidebar for your chosen backup plugin.
You know this step worked when the plugin is active and you see its settings page in your WordPress dashboard. You are now ready to configure scheduled backups.
For more context on how hosts and plugins work together, review WordPress hosting backups.
Step 4: Configure Automatic Backup Schedules
Automatic schedules protect you even when you forget to run manual backups. Configure your backup plugin so it runs on the strategy you planned earlier.
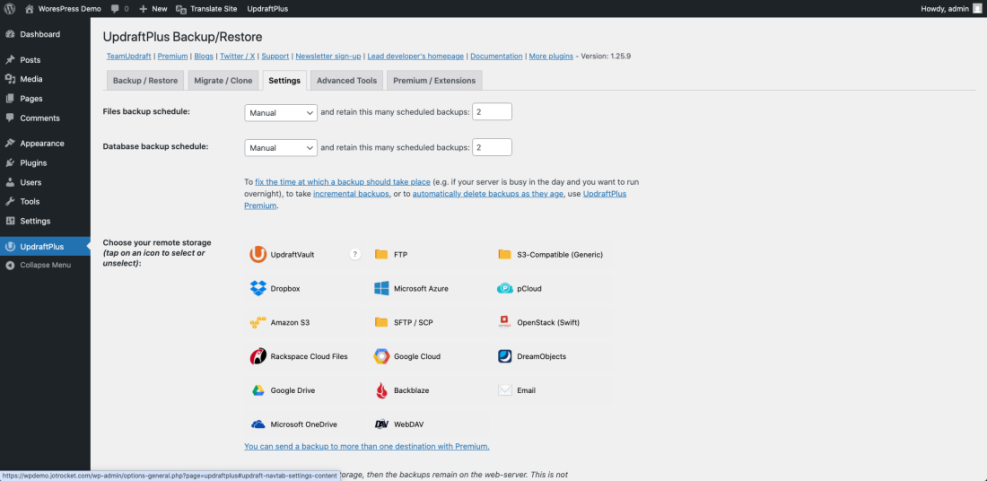
- Open your backup plugin settings from the WordPress dashboard, usually under Settings » Your Backup Plugin Name.
- Set the Files backup schedule to daily or weekly based on how often your site files change.
- Set the Database backup schedule to at least as frequent as your content changes, often daily for blogs and stores.
- Adjust the Retention or Number of backups to keep fields to match the plan you wrote down in Step 2.
- Choose a remote storage option such as Google Drive, Dropbox, or Amazon S3, then follow the plugin prompts to connect your account.
- Click Save Changes or Save Settings to apply your schedule and storage configuration.

You know this step is successful when you see your schedule listed in the plugin and a test connection to your cloud storage passes without errors.
Step 5: Run and Store Your First Backup
Now that your schedule is configured, create your first full backup manually. This confirms the plugin works and gives you a recent restore point before you change anything else.
- Go to your backup plugin page in the WordPress dashboard.
- Find the Backup Now, Run Backup, or similar button.
- Select options such as Include files and Include database if your plugin offers them, then click Backup Now.
- Wait until the progress indicator shows the backup is complete. Do not close the browser tab until it finishes.
- Locate the list of completed backups and click the available Download links for your database and files to save a copy to your computer.
- Optionally, create a dedicated folder on your computer named with today’s date and move the downloaded backup files into it.
You know this step worked when you see a completed backup entry with today’s date and you have at least one backup file stored off your server.
If you are comfortable with the command line, you can also create database exports with WP-CLI:
# Export the WordPress database to a dated SQL file
wp db export ~/backups/`date +%F-%H%M`-database.sql
Step 6: Practice Restoring WordPress from Backups
A backup strategy is incomplete until you have successfully restored at least once. Practice restoring in a safe way so you are not learning under pressure during a real emergency.
- If your host offers a staging feature, create a staging copy of your site using their Staging or Clone tool. This gives you a safe environment to test restores.
- On the staging site, open your backup plugin and locate the Restore or Upload backup files section.
- If needed, upload the backup files you downloaded in Step 5, or select an existing backup entry from the list.
- Choose what to restore, such as Database, Plugins, Themes, and Uploads, then click Restore.
- Wait for the restore process to finish. Then browse the staging site, check several pages and posts, and log in to confirm the site behaves as expected.
- Compare the restored staging site with your live site to ensure content, menus, and settings match the backup date.
You know this step is successful when the staging copy fully matches the state of your site at the time you ran the backup. If you need a more detailed walkthrough, follow Beginner guide to WordPress speed optimization.
When you are comfortable with restores, you can test more advanced scenarios in Common WordPress backup errors and how to fix.
Step 7: Test and Maintain Your Backup and Restore Plan
Backups are not a one time setup. You must verify they continue working and update your plan as your site grows, especially when you add eCommerce, membership, or learning features.
- Schedule a recurring reminder, such as once per month, to log in and confirm that recent backups are listed in your plugin and in your cloud storage account.
- Download a recent backup file and open it to ensure it is not empty or corrupted.
- At least once every few months, repeat a test restore on staging to verify the process still works.
- Update your backup schedule if you start publishing more often or add features like online sales that create more frequent data changes.
- Incorporate backups into a broader care routine by following WordPress maintenance backup plan.
- Keep a simple written checklist with login URLs, backup locations, and restore steps in a password manager or secure document.
You know your plan is healthy when backups consistently appear on schedule, restores work reliably on staging, and your written checklist makes it easy for someone else to help in an emergency.
Conclusion You Are Ready to Go
You now understand what WordPress backups must include, how often to run them, and how to store them safely offsite. You installed a backup plugin, created your first full backup, and practiced restoring it on a staging copy so you know the process works.
With this backup and restore strategy in place, you are far less likely to lose sleep over updates, experiments, or unexpected outages. Continue refining your plan as your site grows, and review it regularly so your backups always match the importance of your content and business.
Further Reading
- Install WordPress step by step
- WordPress backup strategy
- How to Create a WordPress Disaster Recovery Plan
- How to publish WordPress site
- WordPress backup plugins online stores