Beginner Guide to WordPress Permalinks
Learn safe URL settings that support SEO and growth
WordPress Permalinks control the permanent URLs for your posts, pages, and archives. If you leave the default settings, your links can look messy, confuse visitors, and limit your SEO results. In this beginner guide to WordPress Permalinks, you will learn how to pick a safe structure, change it correctly, and avoid common mistakes.
By the end of this tutorial, you will configure a clean permalink structure, customize individual slugs, and safely update existing URLs without breaking links or losing search traffic.
What You Need to Start
- Access to your WordPress Admin Dashboard with an Administrator account.
- A working WordPress site installed on a web host.
- A recent backup of your site files and database before changing URLs.
- For live sites, a staging site or maintenance window if you plan major changes.
Step 1: Understand how WordPress permalinks work
Before you change anything, understand what permalinks do and how they affect SEO and user experience. A permalink is the full URL that points to a specific post, page, or archive on your site.
- Open a post on your site in a browser and look at the address bar.
- Identify the domain part (for example, https://example.com).
- Identify the path after the domain (for example, /2025/01/sample-post/).
- Note whether the URL is short and readable or long with dates and numbers.
For a quick concept refresher, read your existing overview in What is and Latest WordPress.
Step 2: Open the Permalinks settings screen
Next, open the central screen where WordPress controls the permalink structure for your entire site.
- Log in to your WordPress admin at /wp-admin.
- In the left sidebar, hover over Settings.
- Click Permalinks.
- Wait for the Permalink Settings page to load. You will see several radio buttons for different structures.
If you are completely new to WordPress, review How to Use WordPress for a broader dashboard tour.
Step 3: Choose an SEO friendly permalink structure
Now decide which permalink structure you will use. For most sites, a simple post-name based URL works best for clarity and SEO.
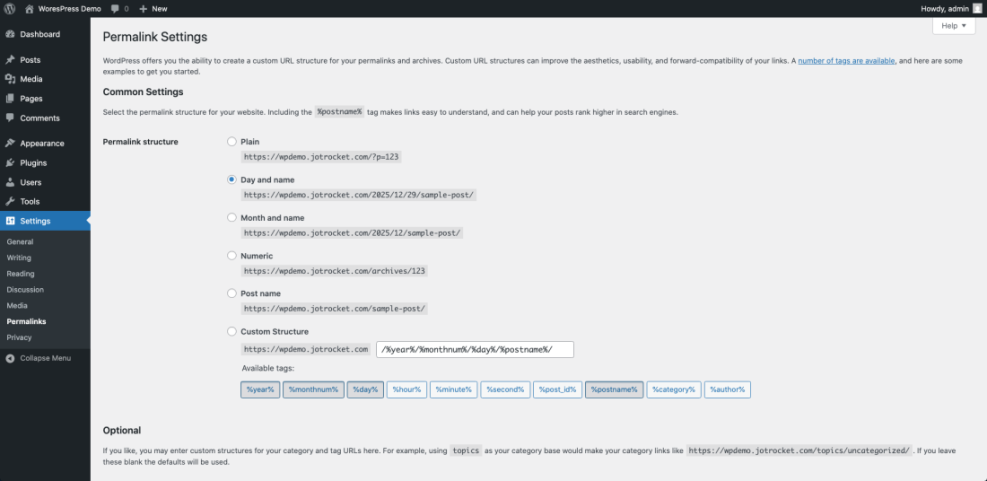
- On the Permalink Settings page, locate the list of common settings.
- Review the options such as Plain, Day and name, Month and name, Numeric, and Post name.
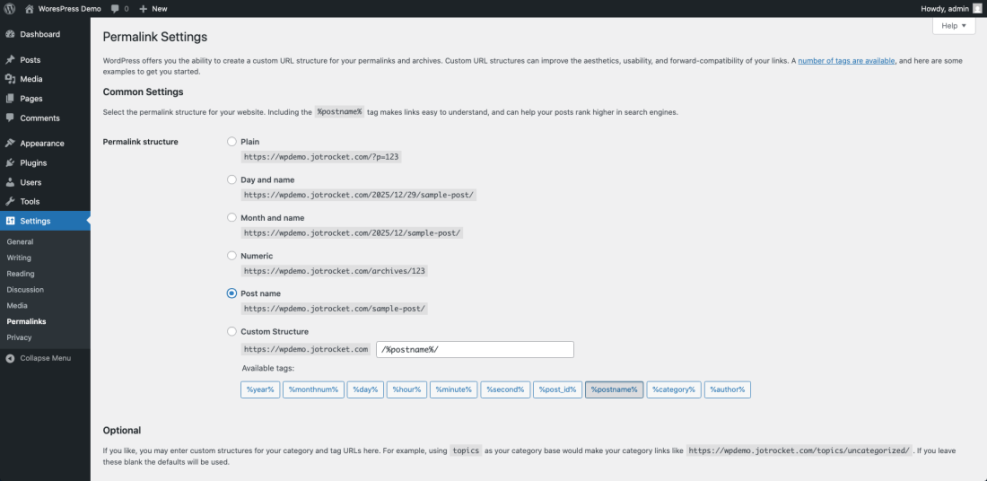
- For new sites, click the radio button for Post name to use URLs like /sample-post/.
- Scroll to the bottom and click Save Changes.
To understand how this fits into your broader SEO setup, see WordPress SEO Basics for Complete Beginners.
Step 4: Edit individual post and page slugs
Even with a good global structure, you still need clean slugs for each piece of content. Slugs are the editable part of the URL for a specific post or page.
- In your dashboard, go to Posts » All Posts.
- Hover over a post and click Edit.
- In the editor, locate the Permalink or URL area, usually near the title.
- Edit the Slug field so it is short, lowercase, and uses hyphens between words, for example wordpress-permalinks-guide.
- Click Update to save the change.
You can use the same approach for pages and custom post types. Keep slugs descriptive but avoid stop words, dates, or very long phrases.
Step 5: Use custom permalink structures when needed
Some sites need more than just the post name. For example, news sites may include the year, or blogs may include a category before the post name.
- Return to Settings » Permalinks.
- Select Custom Structure.
- Click the available structure tags under Available tags to insert them, or type them manually.
- Common examples include /%category%/%postname%/ or /%year%/%postname%/.
- Click Save Changes when finished.
Example custom structures:
  /%postname%/
  /%category%/%postname%/
  /blog/%postname%/
After saving, visit a few posts to confirm the new URLs load correctly and do not show 404 errors.
Step 6: Change existing permalinks safely with redirects
If your site is already live with traffic, changing permalink structure requires extra care. You must redirect old URLs to the new ones to keep both users and search engines happy.
- Create a full backup of your site using your usual backup plugin or host tools.
- If possible, clone your site to a staging environment and repeat Step 3 and Step 5 there first.
- Install and activate a reliable redirect plugin from Plugins » Add New (for example, search for Redirection from WordPress.org).
- Change your structure under Settings » Permalinks and click Save Changes.
- Configure redirects from old patterns to new ones using your chosen plugin or your web server configuration.
If you prefer manual redirects on Apache hosting, your developer can add rules like this to .htaccess:
# Redirect old /year/month/post/ URLs to /post/
RewriteCond %{REQUEST_FILENAME} !-f
RewriteCond %{REQUEST_FILENAME} !-d
RewriteRule ^[0-9]{4}/[0-9]{2}/(.+)$ https://example.com/$1 [R=301,L]After changes, use a tool like your browser’s Network tab or an online redirect checker to confirm you receive 301 responses from old URLs.
Step 7: Test permalinks and fix common problems
Once your structure and slugs are updated, test thoroughly so visitors do not hit broken links.
- Visit your homepage and click several recent posts, pages, and category archives to confirm each URL loads.
- In the dashboard, go to Settings » Permalinks and click Save Changes once more to refresh rewrite rules.
- Check your contact forms, menus, and widgets for any hard-coded URLs that may still use the old structure.
- In a few days, review 404 Not Found errors in your analytics or server logs and add redirects for any missed URLs.
If you see many errors or blank pages, follow the guidance in Troubleshooting Common WordPress Errors and Crashes.
Conclusion You Are Ready to Go
You have now learned what WordPress permalinks are, how to pick a clean, SEO friendly structure, how to edit individual slugs, and how to change existing URLs without breaking your site. With a good permalink plan, your content is easier to understand for both visitors and search engines, and future content will automatically follow the same pattern.
Keep using consistent, descriptive slugs for new posts and review your structure whenever your site’s content strategy changes. Combined with solid on-page optimization, your permalink setup will support long-term SEO growth.
Further Reading
- What is Managed WordPress
- What is the Purpose of Permalinks in WordPress
- Beginner Guide to WordPress Categories and Tags