Your WordPress menus are the map of your site. If they’re confusing, cluttered, or missing, visitors get lost and leave long before they ever read your content or buy your products. The good news: you don’t need to be a developer to build a clean, clickable WordPress menu.
In this beginner-friendly guide, you’ll learn exactly how to plan your navigation, create WordPress menus in the dashboard, assign them to the right theme locations, and build dropdowns and submenus. If you’re brand new to the platform, you may also want to review what WordPress is and how it works so the terminology feels familiar as you go.
We’ll focus primarily on the classic menu system used by themes like Jannah, and we’ll briefly note what’s different if you’re using a modern block theme. By the end, you’ll have a professional-looking WordPress menu that works smoothly on both desktop and mobile.
Prerequisites for Working With WordPress Menus
Before you start building WordPress menus, make sure you have the basics in place. You don’t need a finished design, but you do need a working WordPress site you can log in to.
- An installed WordPress site (self-hosted or on a managed host).
- Admin or Editor access to the WordPress dashboard.
- At least a few published pages (like Home, About, Contact). If you still need to do this, follow the steps to set up your first WordPress website.
- Your active theme (for example, Jannah) already installed and enabled.
Step 1: Plan Your WordPress Menus and Navigation
It’s tempting to jump straight into clicking around the Menus screen, but a few minutes of planning will save you a lot of rework. Think of your navigation as the shortest path to what visitors care about most.
- List your most important pages: Home, About, Services, Blog, Shop, Contact, etc.
- Group related items: for example, “Services” with sub-pages for each service, or “Resources” with sub-pages like “Blog” and “Guides”.
- Decide what belongs in the main menu versus the footer or secondary menu.
For a beginner-friendly site, try to keep your main menu to 5–7 top-level items. Everything else can go into dropdowns or your footer so visitors aren’t overwhelmed with choices.
Step 2: Create Your First WordPress Menu
Now you’re ready to build the menu structure inside WordPress. These steps apply to classic themes and are perfect if you’re using Jannah or most popular non-block themes.
- Log in to your WordPress dashboard.
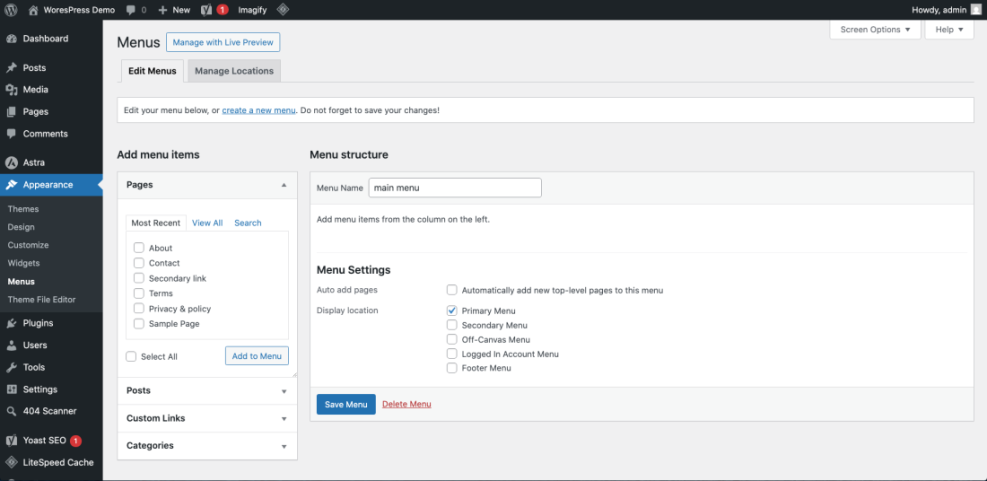
- Go to Appearance → Menus.
- In the “Menu Name” field, enter a name like Main Menu or Primary Navigation.
- Click Create Menu.
You now have an empty WordPress menu ready for items. Think of it as a container that will later be assigned to a “location” in your theme (like the top header).
WordPress Menus in Block Themes
For block themes (like the default Twenty Twenty-Three and later), open Appearance → Editor, click the site header area, select the Navigation block, and edit menu items directly within the block. The overall principles in this guide still apply: plan top-level items, add pages, and arrange submenus—but the interface looks more like a visual editor than the classic Menus page.
Step 3: Assign WordPress Menus to Theme Locations
Creating a WordPress menu isn’t enough; WordPress also needs to know where to display it. Themes define different “locations” such as Primary, Secondary, and Footer.
- On the Appearance → Menus screen, scroll to the Menu Settings section at the bottom.
- Look for options like Primary Menu, Main Navigation, or Footer Menu.
- Check the box next to the location where this menu should appear (for example, Primary).
- Click Save Menu.
In many themes, including Jannah, the “Primary” or “Main Navigation” location controls the main menu at the top of your site. After saving, visit your homepage to confirm the menu appears in the header.
Step 4: Add Pages, Posts, and Links to Your WordPress Menu
With your menu created and assigned, you can now add items to it. On the left side of the Menus screen, you’ll see panels for Pages, Posts, Custom Links, Categories, and more.
- In the Pages panel, click View All to see all your pages.
- Check the boxes for the pages you want in the menu (for example, Home, About, Contact).
- Click Add to Menu. The items will appear in the Menu Structure area on the right.
- To add an external link (like a shop on another domain), open the Custom Links panel, enter the URL and Link Text, then click Add to Menu.
Drag and drop items in the Menu Structure to change their order. Items higher in the list appear further left in a horizontal menu or higher up in a vertical menu.
Extra Item Types in WordPress Menus
- Categories: Useful if you want a menu item like “Blog” to show the latest posts from a specific category.
- Posts: Helpful for highlighting a specific important article or sales page.
- Custom Links: Great for external resources, downloads, or tools.
Step 5: Create Dropdown WordPress Menus and Submenus
Dropdown menus (also called submenus) let you organize related content under one top-level item. This keeps your main navigation lean while still giving visitors quick access to deeper pages.
- In the Menu Structure, drag a menu item slightly to the right under another item.
- When the item appears indented, release it—WordPress labels it as a sub item.
- Repeat for additional submenu items under the same parent.
- Click Save Menu and refresh your site to confirm the dropdown appears when you hover or tap.
A common pattern is “Services” as the parent item, with each service page as a submenu. Keep your dropdowns shallow—one level deep is usually enough for usability.
Step 6: Improve WordPress Menu Design and Usability
Once your structure is in place, spend a few minutes improving how the WordPress menu looks and behaves. Small adjustments can dramatically improve usability and click-through rates.
Check Your WordPress Menu Appearance in Your Theme
- Go to Appearance → Customize.
- Open the section related to your header or menus (in Jannah, look for Header/Nav settings).
- Adjust options like alignment, logo placement, and whether the menu is sticky (stays at the top when you scroll).
Test WordPress Menus on Mobile Devices
- Open your site on a phone or use your browser’s responsive preview tools.
- Tap the mobile menu icon (hamburger) and ensure all items and dropdowns are accessible.
- Check that labels don’t wrap in awkward ways or overlap other header elements.
For more in-depth style adjustments (fonts, spacing, colors, hover effects) specific to your header and navigation, see this guide on how to edit the WordPress navigation bar.
Troubleshooting Common WordPress Menu Problems
Even simple WordPress menus can misbehave if a setting is off or a plugin interferes. Here are quick fixes for the issues beginners hit most often.
WordPress Menu Doesn’t Show on the Site
- Check that your menu is assigned to a location under Menu Settings (Step 3).
- Make sure your theme actually supports a menu in the area you’re looking at (some headers use custom widgets or builders).
- If you’re using a block theme, confirm that the correct Navigation block is placed in your header template.
Wrong WordPress Menu Appears After Theme Change
- When you switch themes, menu locations change. Revisit Appearance → Menus and reassign your desired menu to the new theme’s primary location.
- If the old menu is missing, click the “Manage Locations” tab (if available) to map menus to the new locations.
Dropdown WordPress Menus Don’t Work on Mobile
- Temporarily disable caching or performance plugins to rule out JavaScript conflicts.
- Check that touch/click behavior for dropdowns is enabled in your theme’s header settings.
- Update your theme and key plugins to the latest versions to benefit from bug fixes.
Bring Your WordPress Menus and Navigation Together
A clear, well-structured WordPress menu is one of the highest-impact improvements you can make to a site—especially as a beginner. You’ve now planned your navigation, created a main menu, assigned it to the right location, organized dropdowns, and refined its design for desktop and mobile.
As you add new pages and content, revisit your WordPress menus regularly to keep them focused on what visitors need most. Over time, your navigation becomes a powerful guide that quietly directs users to the right information, boosts engagement, and supports your business goals.
Further Reading on WordPress Menus
- Beginner guide to WordPress speed optimization
- How to Edit a WordPress Website
- How to Edit the Footer in WordPress
- How to Design a Website with WordPress
Frequently Asked Questions About WordPress Menus
Why doesn’t my WordPress menu show on the site at all?
The most common reason is that your menu isn’t assigned to a theme location. Go to Appearance → Menus, select your menu, and ensure a location like Primary or Main Navigation is checked under Menu Settings. Then click Save Menu and refresh your site. If you’ve just changed themes, you may need to reassign your WordPress menus to the new theme’s locations.