Beginner Guide to WordPress Backup and Restore Strategies
Protect your content with a simple backup and restore plan
WordPress Backup and restore strategies protect your site from hacks, hosting failures, and even simple mistakes like deleting the wrong page. Without a clear plan, one bad update or a broken plugin can wipe out months of work in seconds.
In this guide, you will build a complete backup and restore blueprint for your WordPress site. You will decide what to back up, where to store it, how often to run backups, and how to safely restore your site when something goes wrong.
What You Need to Start
- Administrator access to your WordPress dashboard.
- Login access to your hosting control panel or server dashboard.
- Enough disk space locally or in cloud storage for at least several full site backups.
- Basic ability to install and configure a WordPress backup plugin.
- Thirty to sixty minutes of uninterrupted time to plan and configure your backup strategy.
Step 1: Map Your Backup and Restore Risks
Before you install any tools, understand what you are protecting and what could go wrong. A clear risk list helps you design a WordPress backup and restore strategy that fits your site, not someone else’s.
- List the most important parts of your site such as blog content, WooCommerce orders, membership data, or forms.
- Write down common risks including hacked site, bad plugin update, server failure, and accidental content deletion.
- Decide your maximum acceptable data loss, often called your recovery point objective, such as “no more than one day of changes.”
- Decide how fast you need to be back online, your recovery time objective, for example “within one hour” or “within one day.”
Write your risk list and objectives into a simple document or spreadsheet so you can refer to it later.
Describe this list visually in your planning document before you continue to the next step.
To verify this step, confirm you have a written list of assets, risks, and two clear targets for how much data you can lose and how quickly you must restore.
Step 2: Decide What to Back Up and How Often
A solid strategy covers both your WordPress files and your database, on a schedule that matches how often your site changes. This step turns vague “we should back up” ideas into clear rules.
- In your hosting file manager, locate your site’s root directory, usually named public_html or your domain name folder.
- Confirm that it contains folders such as wp-admin, wp-content, and wp-includes and files like wp-config.php.
- In your hosting control panel, open phpMyAdmin or your database tool and note the name of your WordPress database.
- Decide your backup scope: full site backups including files and database, or separate database-only plus occasional file backups.
- Match your schedule to site activity. For busy blogs or stores, plan at least daily backups. For static brochure sites, weekly may be enough.
Navigate to your hosting file manager and database tool so you can see exactly what your backup will include.
To verify success, confirm you have documented which folders and databases to include and written down a clear schedule, such as “daily incremental, weekly full, before every major update.”
Step 3: Choose Your Backup Tools and Storage Locations
Now choose the tools that will perform your backups and decide where to store them. Combining a backup plugin with host level backups gives you an extra safety net.
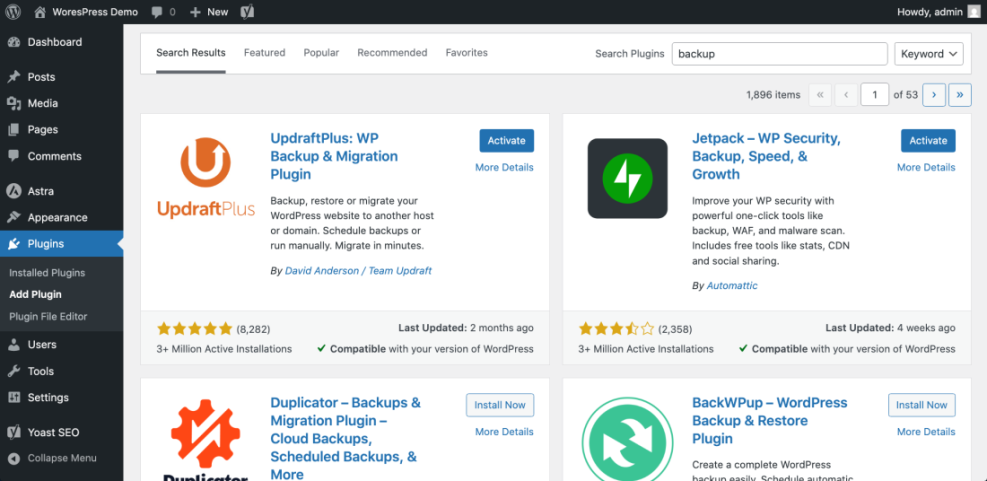
- Log in to your WordPress dashboard and go to Plugins » Add New.
- Search for your chosen backup plugin, then click Install Now and Activate.
- Open your hosting panel and check whether automatic full backups are available from your host.
- Create a new folder in your preferred cloud storage such as Google Drive, Dropbox, or Amazon S3 dedicated to WordPress backups.
- Decide how long to keep backups, for example thirty days for daily backups and three to six months for weekly or monthly backups.
Navigate to Plugins » Add New to confirm you can see and install the backup plugin you plan to use.
To verify success, confirm you have at least one backup plugin installed, have host backups enabled if available, and have tested access to your off site storage by uploading a small test file.
For help evaluating options, read How To Choose A Reliable WordPress Backup Plugin and, if you want to compare tools by features, see Best Free WordPress Backup Plugins for Small Sites.
Step 4: Configure Automated Backups in WordPress
With your tool and storage selected, configure automated schedules that match the rules you defined earlier. Automation ensures backups run even when you forget.
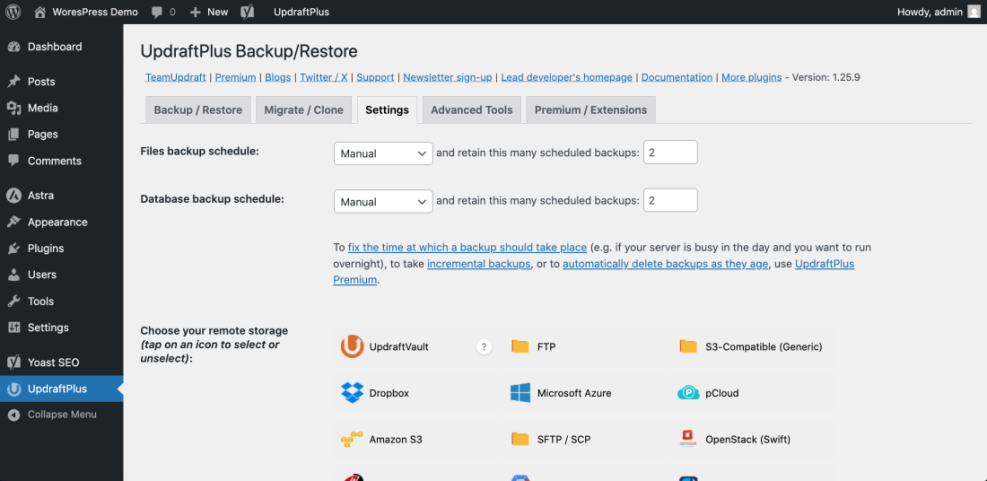
- In your dashboard, go to Settings for your backup plugin, usually found under a menu such as Settings » Backups or its own top level menu.
- Enable a full backup schedule that includes both Database and Files such as wp-content, themes, plugins, and uploads.
- Set the backup frequency to match your plan, for example Daily for database and Weekly for full site.
- Connect your backup plugin to your cloud storage by clicking the appropriate service, authenticating, and selecting your backups folder.
- Configure retention, choosing how many backups to keep before older ones are deleted automatically.
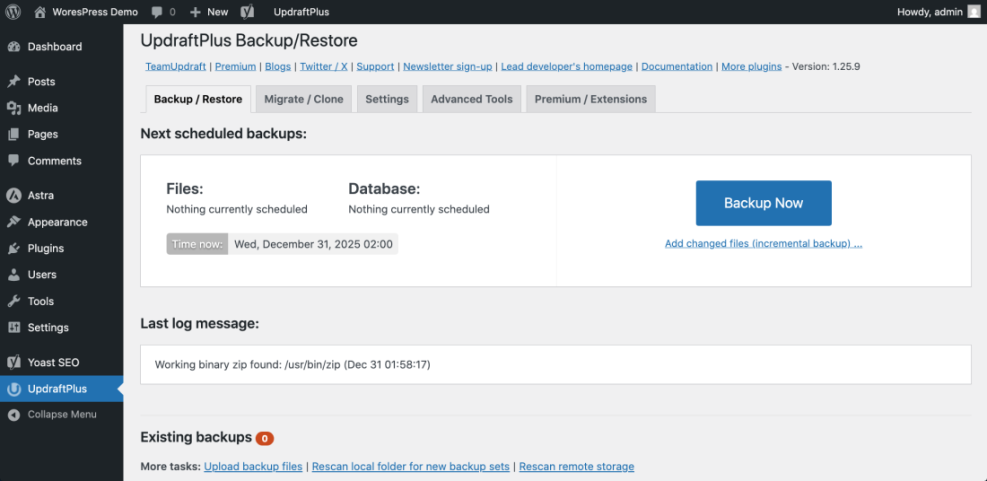
- Run your first manual backup by clicking Backup Now or similar to create a test restore point.
Navigate to your backup plugin settings page and ensure both database and files are selected before saving your schedule.
To verify success, check the backup plugin logs or history screen to confirm your first backup completed without errors. Download the backup archive to your computer and open it to ensure it contains your wp-content folder and a database export file.
If you want detailed plugin walkthroughs, follow the steps in Step By Step Guide To WordPress Backups or Step by Step WordPress Backup Plugin Setup.
Step 5: Plan Your Restore Paths for Different Disasters
A backup is only useful if you know exactly how to restore from it under pressure. In this step, you design simple restore checklists for different failure scenarios.
- Identify at least three scenarios such as “bad plugin update,” “hacked site,” and “server failure” based on your earlier risk list.
- For each scenario, write a short restore plan, including who will perform the restore and which tools they will use.
- For dashboard level issues, note how to log in to WordPress, open your backup plugin, and click Restore on the appropriate backup set.
- For complete failures where WordPress is inaccessible, outline how to log in to your hosting control panel, restore files from host backups, and restore your database in phpMyAdmin or your host’s restore tool.
- Document where your backup archives are stored and how to download them if your host dashboard is not available.
Navigate to your backup plugin’s Backup / Restore screen so you can see the list of restore points and the Restore action for each.
To verify success, check that your restore checklist includes clear steps for both plugin based restores and host level restores. For more detailed restore walkthroughs, see Beginner Guide to Restoring WordPress from Backups and Step By Step Guide To Restoring A Broken WordPress Site.
Step 6: Test Your Backups and Document the Process
The only way to trust your WordPress backup strategy is to prove that restores actually work. A safe test removes surprises when a real emergency happens.
- Create a staging site using your host’s Staging feature or a staging plugin, or set up a separate subdomain for testing.
- Copy your current live site to the staging environment using your host tools or backup plugin.
- On the staging site, restore from one of your recent backups using the same steps you would follow on your live site.
- After the restore finishes, browse the staging site, log in to WordPress, and test key functions such as login, checkout, or form submissions.
- Record how long the restore took and note any errors or steps that felt confusing.
- Update your backup and restore checklist with improvements based on the test.
Navigate to your host’s Staging or Clone feature and confirm you can create or access a test copy of your site before running your restore test.
To verify success, confirm that the staging site looks and behaves exactly like your live site at the time of the backup. If anything is missing, adjust your backup scope or plugin settings and repeat the test. For a dedicated walkthrough, follow How to Test WordPress Backup Restores Safely.
If you want a simple command line safety net as an extra layer, you can use WP CLI on advanced hosting plans.
# Export the WordPress database
wp db export wp-backup-$(date +%F).sql

# Create a compressed archive of wp-content
tar -czf wp-content-backup-$(date +%F).tar.gz wp-content
Only run these commands if you are comfortable with SSH and have confirmed the paths with your host.
Conclusion You Are Ready to Go
You now have a practical WordPress backup and restore strategy, not just a plugin installed and forgotten. You defined what to protect, chose tools and storage, configured automated schedules, planned restore paths for real world failures, and tested everything safely.
Keep your plan alive by reviewing it whenever your site changes, such as adding eCommerce, memberships, or heavy new plugins. Combine this guide with regular maintenance using Essential WordPress Maintenance And Backup Plan so backups remain a normal part of how you care for your site.