Introduction to Vanity URLs in WordPress
A vanity URL in WordPress is a short, branded link on your own domain that redirects visitors to a longer destination URL. Instead of sharing an ugly, complex link, you can promote a clean vanity URL that people actually remember and type.
In this tutorial, you will learn exactly how to create a vanity URL in WordPress, connect it to a landing page, set up a 301 redirect, and track how many people use that vanity URL in your campaigns.
If you have ever wondered how to create a vanity URL in WordPress for print, podcasts, or social media, this step-by-step guide walks you through the entire process from planning to tracking.
What You Need to Start with a Vanity URL in WordPress
- A self hosted WordPress site with administrator access.
- Permission to install and activate plugins on your site.
- Pretty permalinks enabled or the ability to change permalink settings.
- The destination page or post you want your vanity URL to point to, or a clear idea of it.
- Basic access to analytics, such as Google Analytics or another stats tool, for tracking clicks on your vanity URLs.
Once you have these basics in place, you are ready to follow the steps in this guide on how to create a vanity URL in WordPress and start using it in your marketing campaigns.
Step 1: Plan Your Vanity URL Goal in WordPress
Plan a Clear Vanity URL or Branded Short Link
Before you touch any settings, decide exactly what your vanity URL should do. A clear goal makes it easier to pick a great slug and measure success later.
- Decide the purpose of the vanity URL, such as a print flyer, podcast mention, or social media bio.
- Write down the long destination URL you want to promote, for example your detailed landing page.
- Choose a short, readable path such as /summer, /guide, or /podcast.
- Keep the slug all lowercase and separate words with hyphens, such as /summer-sale.
- Check that the slug is not already used by an existing page or post on your WordPress site.
Open a blank document or notepad and save the pair of URLs so you can copy them easily during setup. Clearly label which one is the long URL and which one is your new vanity URL so you don’t mix them up.
To verify this step, make sure you have written one clear destination URL and one final chosen vanity URL slug that is not already in use.
Why Learn How to Create a Vanity URL in WordPress
Learning how to create a vanity URL in WordPress gives you a simple way to make any marketing campaign easier to remember and track. Instead of sending people to a long, messy link with tracking parameters, you share a short branded path on your own domain.
Once you understand how to create a vanity URL in WordPress, you can quickly spin up new short links for seasonal offers, podcast episodes, webinars, or offline events and keep all of your traffic flowing through your main site and analytics.
Step 2: Configure WordPress Permalinks for Clean Vanity URLs
Set Up SEO Friendly URLs for Your Vanity URL Structure
WordPress permalinks control how all URLs on your site look. Using a clean structure, such as post name, keeps every vanity URL readable and consistent with the rest of your site.
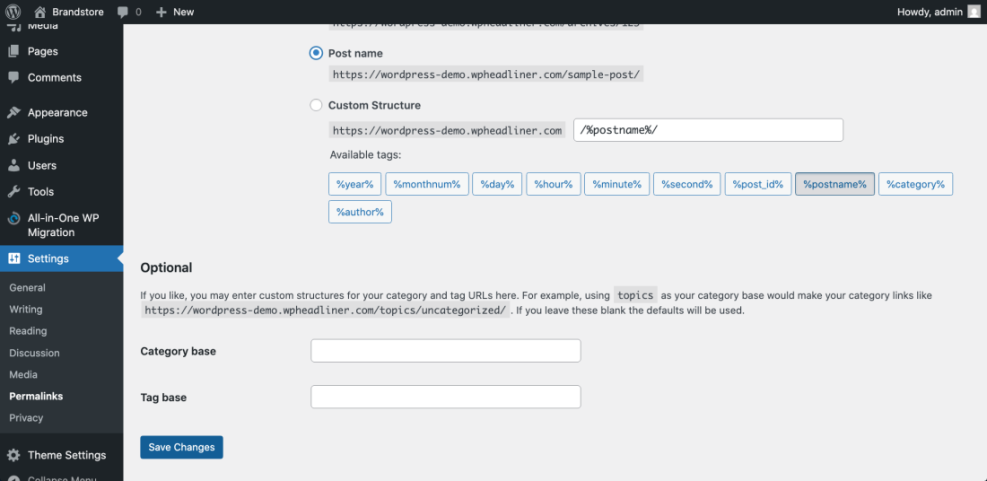
- Log in to your WordPress dashboard as an administrator.
- Navigate to Settings » Permalinks in the left menu.
- Select the Post name option, or choose a suitable Custom Structure if you already use one.
- Scroll down and click Save Changes.
- Open a recent blog post in a new tab and confirm the URL now uses a readable slug instead of numbers.
Navigate to Settings » Permalinks to confirm your site is not using the Plain structure. A clean permalink base helps each vanity URL look professional everywhere you share it, including email, print, and social media.
To verify success, visit a couple of posts or pages and confirm they still load correctly with the updated URL shape before you start adding any new vanity URLs.
Step 3: Create the Destination Page for Your Vanity URL in WordPress
Create Content for Your Custom Vanity URL Landing Page
Your vanity URL will redirect visitors to a specific destination, usually a focused landing page. Set up that page now and give it a clear, descriptive slug.
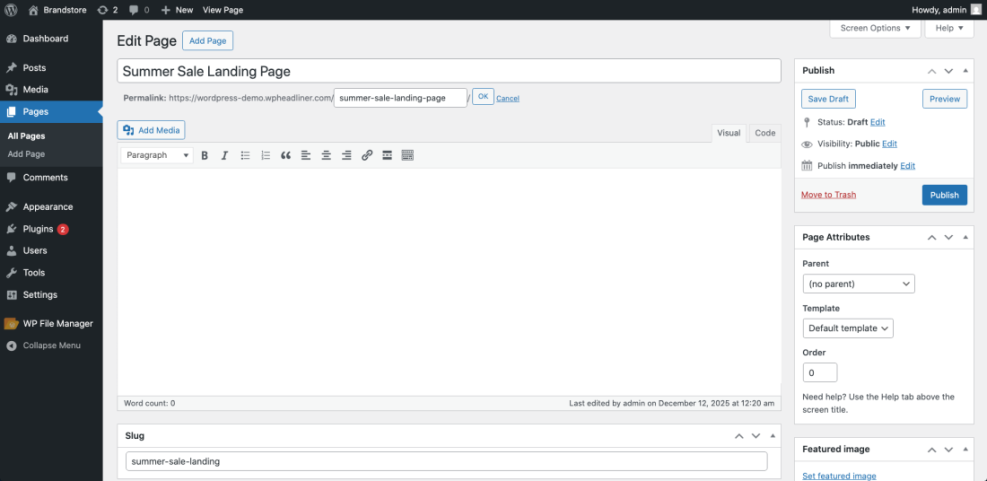
- In your dashboard, go to Pages » Add New or open an existing page you want to promote.
- Enter a clear page title, such as “Summer Sale Landing Page”.
- In the block editor, open the settings panel and find the Permalink or URL SEO and UX, and where you will see it in daily work.”>Slug field.
- Set the slug to something descriptive, such as summer-sale-landing, and update or publish the page.
- Copy the full URL of this page into your notes, including any UTM tracking parameters you want to use.
In the classic editor, look for the Permalink line under the title and click Edit to change the slug before saving. This destination URL is what your vanity URL will point to.
To verify success, open the page in a private or incognito window and confirm the URL and content match what you expect before wiring up the vanity URL redirect.
When you use a vanity URL instead of a long, complicated address, you make it easier for visitors to remember your link, type it correctly, and share it with others. That’s why marketers rely on a vanity URL for offline campaigns, podcasts, and social media bios.
Step 4: Create the Vanity URL Redirect with a WordPress Plugin
Use a Redirect Plugin to Manage Vanity URLs and Short Links
Now you will create the actual vanity URL. The easiest method is to use a free redirect manager so you do not edit server files directly.
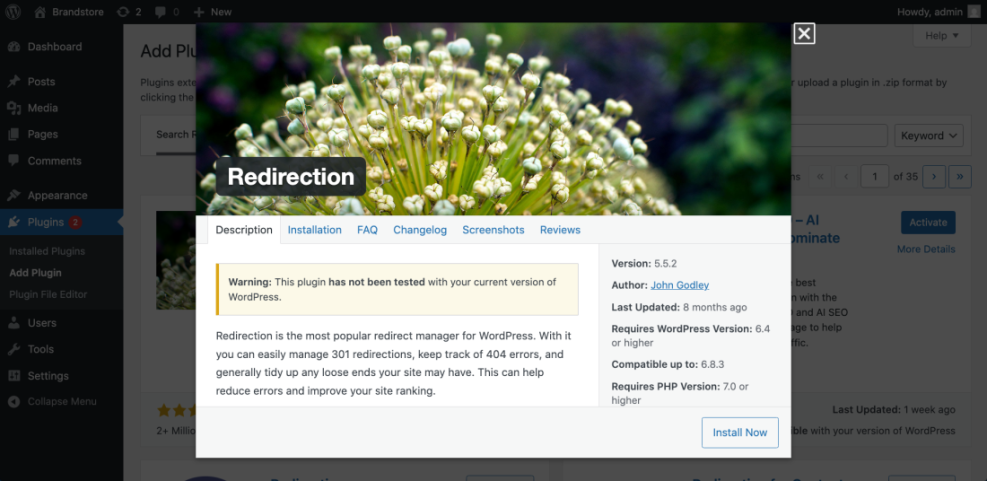
- From the dashboard, go to Plugins » Add New.
- In the search box, type Redirection and wait for results.
- Find the Redirection plugin by John Godley and click Install Now, then Activate.
- After activation, navigate to Tools » Redirection.
- Complete the quick setup wizard, keeping default options unless you have a specific need.
Navigate to Plugins » Add New and search for Redirection to install the plugin.
Next, create your first vanity redirect mapping your short slug to the long destination URL.
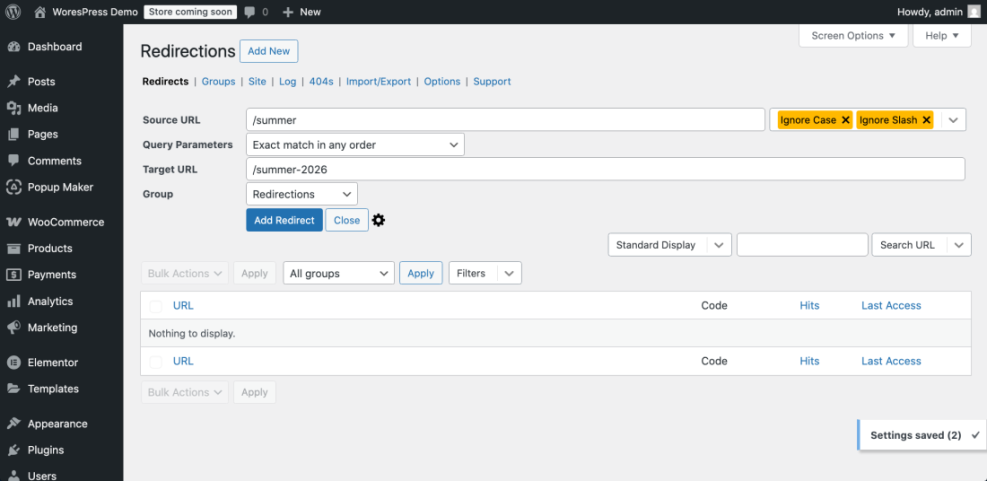
- In Tools » Redirection, click Add new.
- In Source URL, enter your short path, for example /summer. This will be your public-facing vanity URL.
- In Target URL, paste the full destination URL from Step 3.
- Set the HTTP code to 301 – Moved Permanently for a permanent vanity URL.
- Click Add Redirect to save.
Navigate to Tools » Redirection and review the redirect list to confirm your new rule appears with a hit count of zero for the new vanity URL.
To verify success, open a new browser tab, visit https://yourdomain.com/summer, and confirm that you land on the correct destination page via your new vanity URL.
Advanced users can also configure vanity URLs at the server level using .htaccess rules.
Redirect 301 /summer https://example.com/summer-sale-landing/?utm_source=flyer&utm_medium=offlineVanity URL Methods Compared: Short URLs & Branded Links
There are several ways to create and manage a vanity URL in WordPress and around your stack. Here is a quick comparison so you can pick the method that matches your skills and setup.
WordPress-Based Vanity URL Methods and Tools
| Method | Where You Use It | Main Purpose |
|---|---|---|
| Redirect Plugin (Redirection) | WordPress dashboard → Tools » Redirection | Create simple 301 vanity URLs that map short slugs to long destination URLs without touching code. |
| Pretty Links & Link Cloaker Plugins | Plugins section and dedicated menu inside WordPress | Branded short links with detailed click tracking, ideal for campaigns, podcasts, and affiliate links. |
| Server-Level Redirects (.htaccess / Nginx) | Hosting control panel or server configuration files | Fast, low-level redirects managed outside WordPress for performance and advanced control. |
| CDN or Edge Redirect Rules | CDN dashboard (e.g. Cloudflare rules, Fastly config) | Handle vanity URLs at the edge so links work even if WordPress is down or cached aggressively. |
| Third-Party URL Shorteners | External dashboards such as Bitly or Rebrandly | Create short, trackable links when you can’t modify the WordPress site directly or need cross-channel links. |
For most site owners, a redirect plugin like Redirection is the easiest place to start. You can always move specific high-traffic vanity URLs to server or CDN level later if you need extra performance or control, while keeping other vanity URLs managed inside WordPress.
How to Use Your Vanity URL in Real Campaigns
A vanity URL is most useful when you promote it in places where people have to type the link manually. For example, you can say the vanity URL out loud in a podcast episode, print the vanity URL on a flyer, or add the vanity URL to your social media bio.
Because a vanity URL is short and branded, it looks more trustworthy than a long tracking link. When visitors see your vanity URL, they immediately recognize your domain name and know where the link will send them.
As you create your next campaign, decide on one clear vanity URL for it and use that same vanity URL everywhere. This makes it much easier to measure results and compare one vanity URL against another in your analytics.
Step 5: Add Vanity URLs and Short Links to WordPress Menus and Buttons
Once your vanity URL is working, you should make it easy to click from your site navigation and buttons, not just from offline sources.
- Go to Appearance » Menus in your WordPress dashboard.
- Select the menu you want to edit, such as your primary navigation.
- Open the Custom Links panel on the left.
- In the URL field, enter your vanity path, for example https://yourdomain.com/summer.
- Set the Link Text to something clear like “Summer Sale” and click Add to Menu, then Save Menu.
Navigate to Appearance » Menus to see your updated menu structure with the new vanity URL included so visitors can click it directly.
You can also add the vanity URL to buttons inside pages using your page builder by pasting the vanity link into the button’s Link field.
To verify success, visit your site’s front end, click the menu item or button that uses the vanity URL, and confirm it correctly redirects to your destination page.
Step 6: Track Vanity URL Performance in Analytics
Measure Clicks and Conversions from Your Vanity URL Campaigns
Tracking clicks on your vanity URL tells you whether your campaign is working. The Redirection plugin provides basic hit counts, and analytics tools offer deeper insights.
- In the WordPress dashboard, go to Tools » Redirection.
- Locate your vanity redirect in the list and look at the Hits column.
- Click the small graph icon, if available, to view click data over time.
- Confirm that your UTM parameters are present in the Target URL so analytics can label the traffic correctly.
- Open your analytics tool and filter by the campaign or UTM source to see conversions from the vanity URL.
Navigate to Tools » Redirection regularly during your campaign to monitor how often visitors use the short link and your vanity URLs overall.
To verify success, trigger a few test visits to the vanity URL from a different browser, then confirm both the hit counter and analytics reports register the new traffic generated by that vanity URL.
Conclusion: Your WordPress Vanity URLs and Branded Short Links Are Ready
You have planned a clear vanity URL, configured clean permalinks, created a focused destination page, and used a redirect plugin to map a short path to a longer URL. You also added the vanity URL into your menus and buttons and connected everything to your analytics.
At this point you fully understand how to create a vanity URL in WordPress and re-use the same process whenever you launch a new campaign. From here, you can repeat the same steps to create more vanity URLs for different offers, podcasts, or print materials, and use analytics to see which vanity URL brings in the most clicks and conversions over time. The more intentionally you use each vanity URL, the more useful your campaign data becomes.
Further Reading on Vanity URLs, Short Links, and WordPress SEO
- WordPress seo complete beginners guide
- Analytics setup WordPress google analytics
- Internal linking strategies WordPress
- Best WordPress seo plugins and tools