How to Make an Ecommerce Website with WordPress
Build a complete store with WooCommerce and WordPress

If you want to start selling online, building an Ecommerce Website with WordPress and WooCommerce gives you full control without needing to hire a developer. Instead of juggling multiple platforms, you run your products, payments, and marketing from one dashboard you own.
In this step by step tutorial, you will choose hosting, install WordPress, set up WooCommerce, configure payments and shipping, design your store, add products, and test everything so you can confidently launch a secure, conversion ready ecommerce website.
What You Need to Start
- A domain name already registered with any domain provider.
- A WordPress friendly hosting plan with SSL support and PHP 8 or higher.
- Access to your hosting control panel or dashboard to install WordPress.
- Basic product information such as names, prices, descriptions, and images.
- Time to walk through each step without skipping configuration screens.
Step 1: Choose Hosting and Install WordPress
Your ecommerce site needs reliable hosting so it loads quickly and stays online during promotions and traffic spikes. In this step you prepare the foundation by connecting your domain and installing WordPress on your server.
- Log in to your hosting account dashboard using the credentials from your host.
- Locate the website tools area, often labeled Websites, Sites, or WordPress in the main menu.
- Click the option to create a new site or install WordPress, such as Add Website or Install WordPress.
- Select your domain from the dropdown list and confirm that SSL is enabled for that domain.
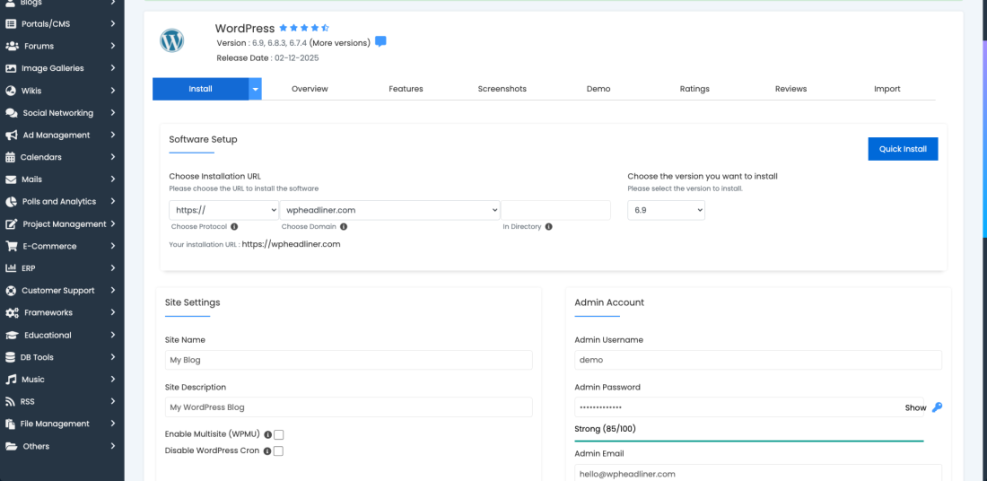
- Enter your site title, admin username, strong password, and admin email address in the installer form.
- Run the installer and wait until it completes, then note the admin login URL shown in the success message.
- Open a new browser tab and visit https://yourdomain.com/wp-admin and log in with the admin credentials you just created.
- If you want a more detailed walkthrough, review How to Install WordPress for additional screenshots and safety tips.
In your hosting control panel, open the WordPress installer screen and confirm your domain, site title, and admin email before starting the installation.
To verify success, visit your domain in a new tab. You should see a default WordPress homepage and be able to access the dashboard at /wp-admin without errors.
Step 2: Install WooCommerce and Run the Setup Wizard
WooCommerce turns your basic WordPress site into a full ecommerce platform with products, cart, checkout, and order management. Installing the plugin and running its setup wizard configures core store details in minutes.
- From the WordPress dashboard, navigate to Plugins » Add New.
- Type WooCommerce into the search field in the top right.
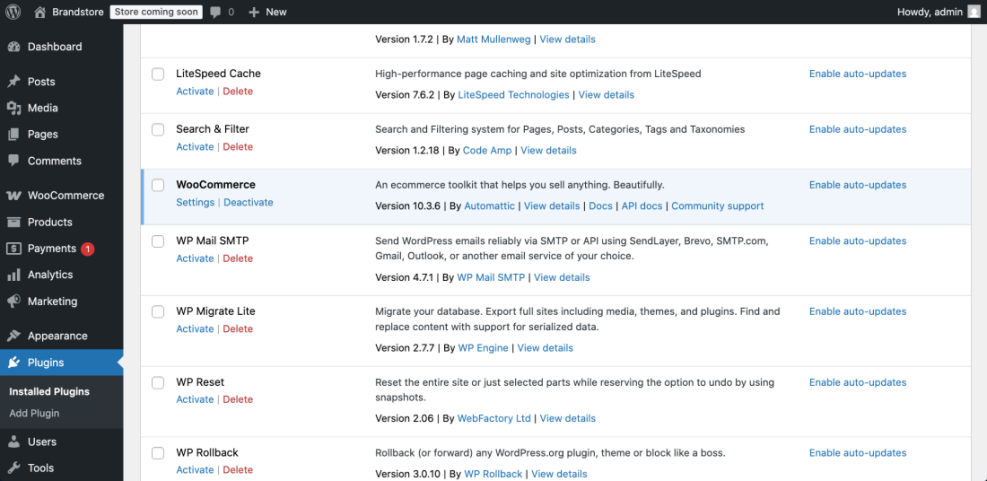
- Locate the official plugin labeled WooCommerce by Automattic and click Install Now, then click Activate.
- When the WooCommerce setup wizard opens, click Get started.
- Enter your store address, country, city, and postcode so taxes and shipping zones work correctly.
- Choose your store currency, for example US dollar, and confirm the types of products you will sell such as Physical or Downloadable.
- Skip optional extensions you do not need yet to keep your store lean.
- Once the wizard finishes, WooCommerce automatically creates key pages like Shop, Cart, Checkout, and My account.
- If you prefer a shorter plugin only tutorial, see Install WooCommerce for an alternative step by step flow.
In your WordPress dashboard, open Plugins » Installed Plugins to confirm WooCommerce is active and visible in the left sidebar menu.
To confirm WooCommerce is installed correctly, visit the Pages screen and look for automatically created store pages such as Cart and Checkout.
Step 3: Configure Core Store Settings
Configuring WooCommerce settings early prevents pricing mistakes, tax surprises, or broken URLs later. In this phase you review general store options, products behavior, and permalink structure.
- From the dashboard, go to WooCommerce » Settings.
- Under the General tab, confirm your store address and set Selling location and Shipping location based on where you ship orders.
- Verify your Currency position, thousand separator, and decimal separator to match local expectations.
- Click the Products tab, then check Add to cart behavior and enable stock management under the Inventory section if you track quantities.
- Click the Accounts & Privacy tab and decide whether customers can create an account during checkout or check out as guests.
- Open Settings » Permalinks in the main WordPress menu and set Post name as your common settings option.
- Scroll to Product permalinks and choose Shop base so product URLs follow a clear structure such as /shop/product-name/.
- Click Save changes at the bottom of both settings screens to store your configuration.
In the WordPress dashboard, open Settings » Permalinks and double check that both the post and product permalink structures are set to clean, descriptive URLs before adding products.

To verify everything is working, visit the Shop page in a new tab and confirm the URL is short, readable, and loads without any 404 errors.
Step 4: Choose and Customize Your Store Theme
Your store’s theme controls the visual design, layout, and mobile responsiveness of your Ecommerce Website. Selecting a lightweight WooCommerce ready theme ensures fast load times and a clean shopping experience.
- Go to Appearance » Themes in your WordPress dashboard.
- Click Add New and filter by Popular or search for WooCommerce to find themes built for stores.
- Hover over a theme you like and click Preview to see how the shop and product pages might look.
- Click Install, then click Activate on your chosen theme.
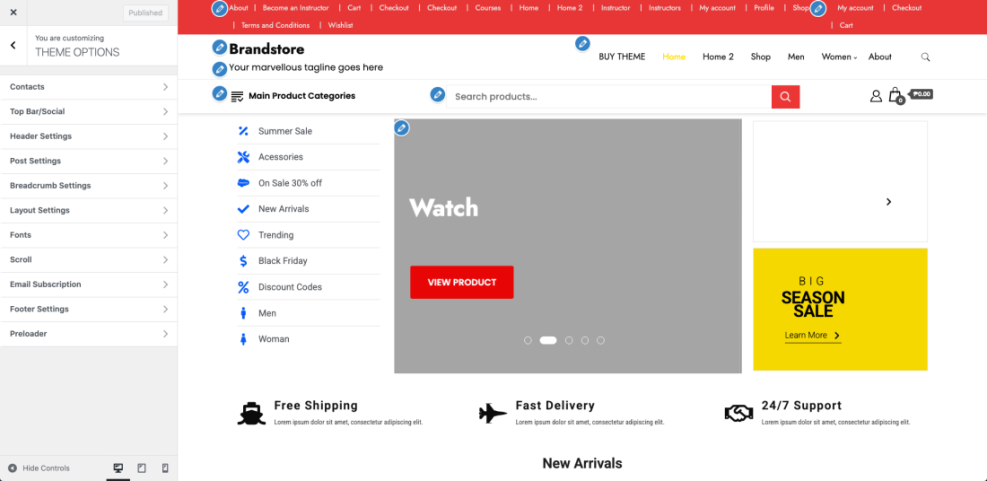
- Navigate to Appearance » Customize to open the theme customizer.
- In the customizer, adjust Site Identity (logo, site title, tagline), Colors, and Typography to match your brand.
- Use the Menus panel to create a primary navigation that includes Shop, About, and Contact links.
- Click Publish to save your design changes.
From the front end, open your homepage and shop page in a new tab to see your new theme layout and ensure the header, footer, and product grid look correct on both desktop and mobile sizes.
For more performance oriented advice, read How to choose WordPress theme before installing heavy page builders or sliders.
Step 5: Add Products and Organize Your Catalog
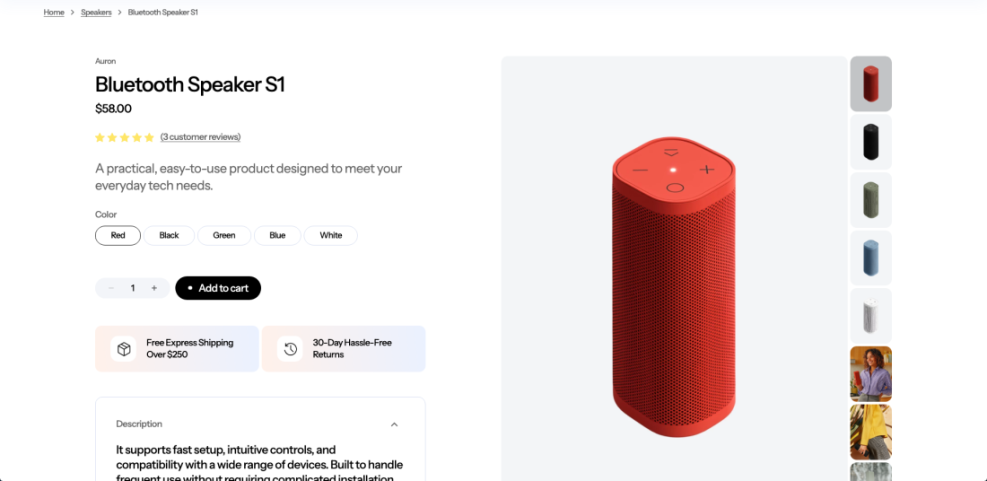
Your Ecommerce Website becomes valuable when real products with clear prices, images, and descriptions are available. In this step you add your first product and structure categories so customers can find items quickly.
- In the dashboard, go to Products » Add New.
- Enter a descriptive product title in the Product name field.
- Write a compelling long description in the main editor explaining benefits, materials, sizing, or usage.
- Scroll down to the Product data box and select Simple product from the dropdown if you are selling a single item.
- Fill in the Regular price field, and optionally a Sale price if you are offering a discount.
- Open the Inventory tab within the product data box to set a SKU and enable Manage stock if you want WooCommerce to track stock status automatically.
- On the right side, use the Product categories panel to add a new category or assign the product to an existing one.
- Set a main product image by clicking Set product image, then upload a clear, high quality photo.
- Add extra gallery images using the Product gallery panel for different angles or color options.
- Click Publish to make the product live.
Open the Shop page and click on your new product to confirm the title, price, images, and add to cart button look correct.
Before adding dozens of products, repeat this process for a few key items to refine your category structure and layout.
Step 6: Set Up Payments Shipping and Taxes
To accept real orders, you must configure payment gateways, shipping options, and tax rules that match your business model. WooCommerce centralizes these settings so checkout can calculate totals automatically.
- Go to WooCommerce » Settings and click the Payments tab.
- Enable at least one gateway such as Direct bank transfer, Cash on delivery, or a card processor extension like Stripe or PayPal.
- Click Set up or Manage next to your chosen gateway and enter required API keys or account details provided by the payment provider.
- Click the Shipping tab and create a new shipping zone for your main region by clicking Add shipping zone.
- Give the zone a descriptive name like Domestic, select appropriate regions or countries, and click Add shipping method.
- Select a method such as Flat rate or Free shipping, then configure prices and conditions.
- To enable taxes, go to the General tab, check Enable taxes, and click Save changes.
- After enabling taxes, open the new Tax tab and edit the Standard rates table with your primary tax rate.
- Save changes on each tab after completing configuration.
From the front end, add a product to your cart and proceed to checkout using a test payment method to confirm shipping costs and tax amounts are calculated correctly before going live.
If you want to reassure customers at checkout and you are comfortable adding code, you can display a custom secure message under the order button using this snippet:
add_action( 'woocommerce_review_order_before_submit', 'wpheadliner_secure_checkout_message' );
function wpheadliner_secure_checkout_message() {
    echo '<p class="secure-checkout-note">Your payment is processed securely over SSL.</p>';
}Step 7: Test Your Store and Optimize Checkout
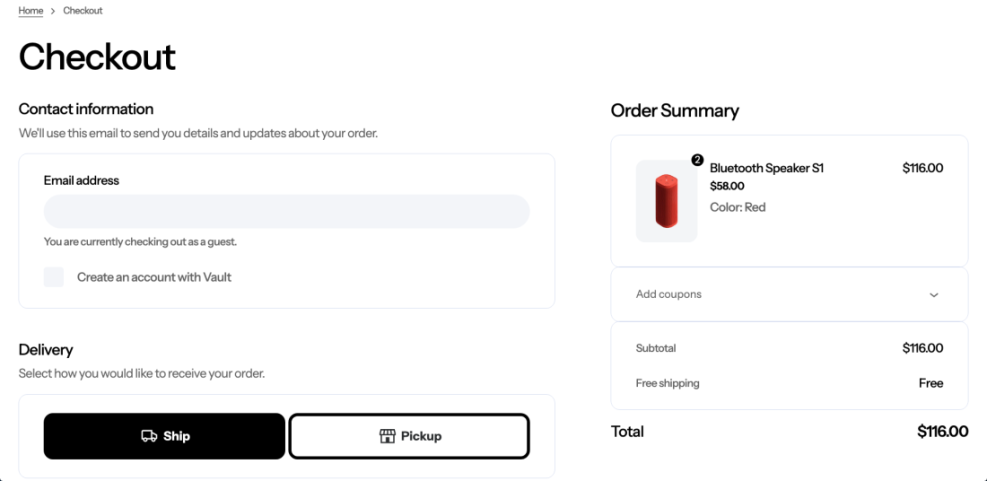
Before inviting customers, thoroughly test your ecommerce flow so cart, checkout, and email notifications behave as expected. Well tested checkouts reduce abandoned carts and support requests.
- In the dashboard, go to WooCommerce » Orders to confirm there are no unexpected test orders from earlier steps.
- Add a product to your cart from the front end and proceed to the checkout page.
- Complete a test order using a sandbox mode or offline gateway such as Cash on delivery.
- Check your inbox to verify that new order emails are sent to both the store admin and the customer address.
- From the dashboard, open WooCommerce » Orders and click into the test order to confirm the status and payment details are correct.
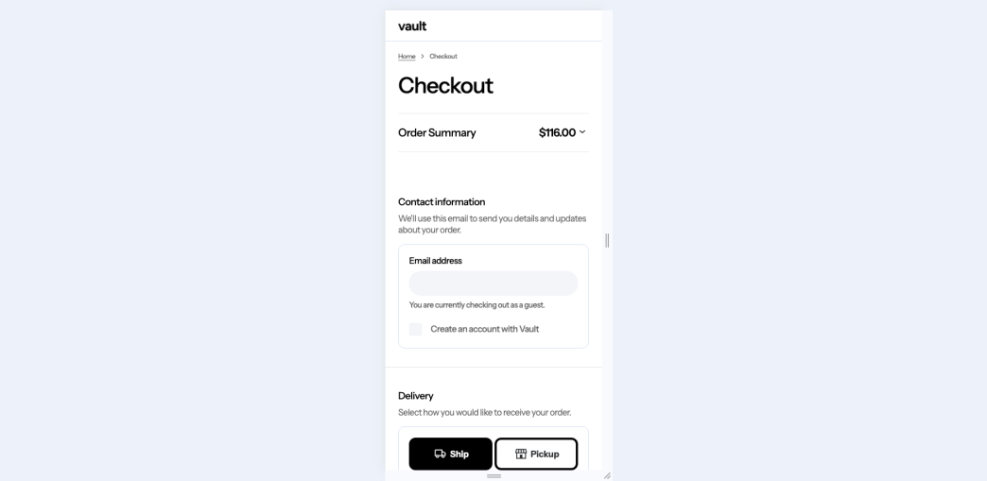
- On mobile, repeat the checkout flow to ensure the cart, forms, and buttons are easy to use on smaller screens.
- Read WordPress speed optimization step by step if you want to further streamline your checkout fields and layout.
On the checkout page, scroll through the form and buttons from top to bottom watching for any fields that look broken or misaligned on smaller viewports.
If your test orders complete without errors and emails arrive quickly, your store is ready for real customers.
Step 8: Secure and Launch Your Ecommerce Website
Security and performance matter more on an Ecommerce Website because you handle sensitive customer data and payments. In this final step you harden your store, set up backups, and remove any remaining test content before launch.
- Confirm your SSL certificate is active by visiting your site and checking that the browser shows https and a secure padlock icon.
- In the dashboard, go to Settings » General and ensure both WordPress Address (URL) and Site Address (URL) start with https://.
- Set up an automatic backup solution following the guidance in Beginner guide to WordPress speed optimization so you can quickly restore your store if anything goes wrong.
- Go to Settings » Reading and make sure the option Discourage search engines from indexing this site is unchecked before launch.
- Delete any sample posts, pages, and products created for testing so customers see only real, purchasable items.
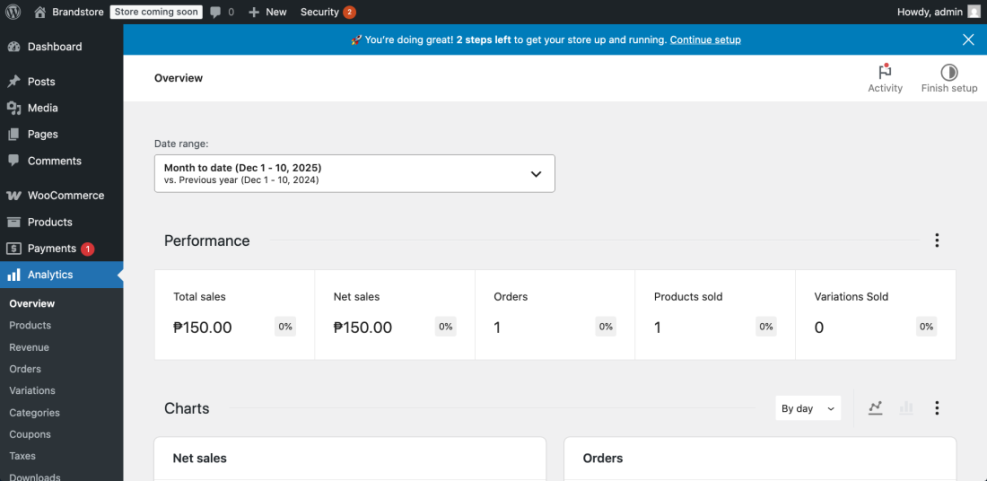
- Finally, place a low value real order using your live payment gateway to verify funds are captured and deposited into your account correctly.
From your analytics or payment dashboard, confirm that your live test order appears with the right amount and customer details so you know your ecommerce pipeline is working end to end.
Conclusion You Are Ready to Go
By following these steps, you installed WordPress, configured WooCommerce, designed a clean storefront, added real products, connected payments and shipping, and tested the full order flow. You now have a fully functional Ecommerce Website on WordPress that you own and control.
Keep refining your product pages, checkout experience, and performance over time. With consistent optimization and marketing, your new WordPress store can grow into a reliable source of revenue.
Further Reading
- Step-By-Step Guide To Launching A WooCommerce Store
- Woocommerce performance tips for faster stores
- Woocommerce performance tips for faster stores
- Is WordPress good for seo
- WordPress speed optimization step by step