Overview of building a multilingual WordPress site
Creating a multilingual WordPress site feels complicated the first time, but the setup is much easier when you follow a clear step by step process.
In this guide you will learn how to choose a translation plugin, configure language specific URLs, add a language switcher and translate your key pages without breaking your existing design.
If you are still getting familiar with the basics, you can start with How to Build a WordPress Website and then come back to add multiple languages.
Prerequisites for a multilingual WordPress website
- A self hosted WordPress site running a recent version of WordPress.
- Administrator access to your WordPress dashboard so you can install plugins and change settings.
- A recent full backup of your site from your hosting panel or backup plugin.
- A list of the languages you want to support and who will translate each one.
Recommended hosting types for a multilingual WordPress site
Multilingual sites usually have more pages, more requests and heavier database usage. Choosing the right hosting early makes your translated pages feel fast and reliable:
| Hosting Type | Who Manages What | Best For |
|---|---|---|
| Basic shared hosting | You handle updates, caching, security plugins, backups, and troubleshooting. | Very small budgets, test sites, hobby blogs. |
| Managed WordPress hosting | Host optimizes the server, automates updates and backups, adds security and performance tools. | Growing blogs, business sites, online stores that need reliability. |
| VPS / cloud DIY | You (or a developer) manage the entire server stack plus WordPress itself. | Developers, agencies, complex custom setups. |
| Fully dedicated server | You get full control and full responsibility unless you pay for extra management. | Very high traffic or specialized enterprise needs. |
If you plan to support several languages and expect traffic from different countries, managed WordPress hosting is usually the easiest starting point.
Step 1: Plan your multilingual WordPress site structure
Before installing anything, decide how your multilingual WordPress site should be organized. A little planning here prevents headaches and messy URLs later.
For most small to medium sites, the easiest setup is a single WordPress installation that uses a translation plugin to create separate URLs for each language.
- Choose your primary language, such as English, Spanish or French.
- List the additional languages you need, for example Spanish and German.
- Decide which content must be translated first: homepage, main service pages, blog posts or WooCommerce product pages.
- Note whether you will use professional translators, bilingual team members or AI assisted translation.
WordPress supports multilingual setups through plugins and includes guidance in its advanced administration documentation, but plugins handle most of the complexity for you.
Step 2: Choose a translation plugin for your multilingual WordPress site
There are many multilingual plugins, but the setup steps are similar. In this tutorial we will focus on using TranslatePress because it is beginner friendly and lets you translate content visually from the front end.
You can follow similar steps with other popular plugins like WPML or Polylang if you prefer their feature set or pricing.
- Check that your theme and important plugins are compatible with your chosen translation plugin.
- Confirm that the plugin supports the number of languages you need on its free or paid plan.
- If SEO is important, look for features like unique URLs per language and automatic hreflang tags.
Step 3: Install your WordPress multilingual plugin
Once you have chosen a plugin, you can install it from the WordPress dashboard. The example below uses TranslatePress, but the steps are similar for most plugins.
- Log in to your WordPress admin dashboard.
- Go to Plugins » Add New.
- Use the search bar to look for TranslatePress.
- Click Install Now next to the plugin name.
- After installation completes, click Activate.

Step 4: Set your multilingual WordPress site languages
Next you tell WordPress which languages your site should use. This ensures that each page can be shown in the right language and that new content uses the correct default.
- In your dashboard, go to Settings » General.
- Confirm the Site Language matches your main content language.
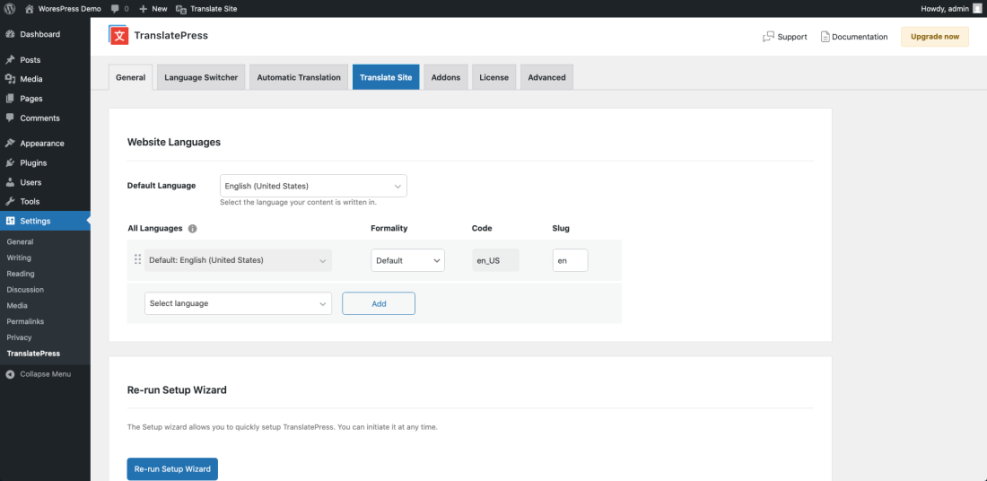
- Now go to Settings » TranslatePress (or the settings page for your plugin).
- In the General tab, check that the Default Language matches your primary language.
- Use the All Languages section to add each additional language you want to support.
- Click Save Changes when you are done.
Most plugins let you reorder languages so that the most important ones appear first in your language switcher. Take a moment to arrange them in a logical order.
Step 5: Configure multilingual URLs and language switcher in WordPress
Search engines and visitors both need clear URLs for each language. Your multilingual plugin handles this, but you should double check the URL structure and language switcher options.
- From Settings » TranslatePress, stay on the General tab.
- Look for options that control how languages appear in URLs, usually as subdirectories such as
/es/or/fr/. - Enable a structure where each language has its own URL, for example
example.com/es/for Spanish. - Scroll down to the Language Switcher options.
- Choose how you want the switcher to appear:
- A floating language switcher that follows users on every page.
- A menu item added to your main navigation.
- A shortcode you can place in a widget or page.
- Save your changes.
For most sites, adding the language switcher to the main menu is the most intuitive option. If your theme uses the block editor for menus, you can also use the plugin’s language switcher block.

Step 6: Add a language switcher to your multilingual WordPress site
Even if your plugin provides a floating switcher, adding language choices to your header or navigation makes it easy for visitors to switch languages at any time.
Option 1: Add the switcher to a classic menu on your multilingual WordPress site
- Go to Appearance » Menus.
- Select your primary menu from the dropdown.
- In the left panel, find the Language Switcher section provided by your plugin.
- Select the languages you want to show and click Add to Menu.
- Drag the new language items into the position you prefer, usually at the far right of the menu.
- Click Save Menu.

Option 2: Use the shortcode in a widget or template on your multilingual site
If you want more control over where the switcher appears, you can use the plugin’s shortcode.
- Go to Appearance » Widgets or the site editor if you are using a block theme.
- Add a Shortcode or Paragraph block where you want the switcher.
- Paste the plugin shortcode, for example
[language-switcher]. - Update your template or widget area.
Developers can also add the shortcode directly in theme files. The following snippet is a simple example you can place inside a header template:
// Display the language switcher in a theme template.
if ( function_exists( 'do_shortcode' ) ) {
  echo do_shortcode( '[language-switcher]' );
}
?>
Step 7: Translate key pages on your multilingual WordPress site
With languages and the switcher in place, it is time to translate your actual content. Translation plugins let you translate directly from the front end so you can see changes in context.
- Open your homepage while logged in to WordPress.
- Click the Translate Page or Translate Site button in the admin toolbar.
- Use the sidebar to select the target language you want to edit.
- Click the pencil icons on headings, paragraphs and buttons to enter translations.
- Translate important strings such as menus, buttons and calls to action first.
- Click Save or Publish when you are finished with that page.
Repeat the process for your primary landing pages, service pages, blog posts and any templates used for product or archive pages.
Step 8: Translate menus, widgets and interface text on your multilingual site
Visitors experience your site through navigation, forms and small interface labels. Make sure these are translated along with your main page content.
- Use the translation editor to click on header and footer menus, then translate each menu item label.
- Translate common interface text such as search labels, button text and form field labels where supported by your plugin.
- If your plugin includes a string translation interface, use it to translate theme and plugin text that does not appear directly on pages.
- Check critical forms such as contact forms, newsletter signups and checkout pages to confirm all important messages are readable in each language.
Some plugins require a premium add on to translate URLs or SEO titles. If that is important for your strategy, confirm the feature is available before committing to a specific tool.
Step 9: Configure multilingual SEO for your WordPress site
Good multilingual SEO ensures that each language version can rank for its own search queries and that users land on the right language from Google and other search engines.
- Make sure each language has unique URLs, usually using language codes in subdirectories such as
/es/,/fr/or/de/. - Set language specific SEO titles and meta descriptions if your plugin integrates with your SEO plugin.
- Use language specific keywords for each version of a page instead of translating keywords word for word.
- Check that your plugin outputs hreflang tags or provides an integration with your SEO plugin to do so.
- Submit updated sitemaps to Google Search Console after adding new languages.
For a deeper overview of SEO fundamentals, you can review WordPress SEO Basics and apply the same principles to each language version of your site.
Step 10: Test your multilingual WordPress site across devices
Finally, test your multilingual setup as if you were a new visitor. This helps you spot missing translations, broken layouts and confusing switcher behavior.
- Visit your site in an incognito window and switch between languages from the language switcher.
- Click through your most important user journeys in each language, such as reading a service page or completing a checkout.
- Check that URLs always stay within the chosen language until you change it.
- Ask native speakers, colleagues or clients to review translations for clarity and tone.
- Monitor analytics to see how visitors in each language region behave on your site.
Make note of any rough edges and plan a second pass of translation and design tweaks once you have feedback from real users.
Next steps to grow your multilingual WordPress site
Once your first languages are live, you can add more translations gradually as your audience grows. Start with your most visited pages, then translate supporting content such as blog posts and documentation.
If you want a more detailed walkthrough of translation workflows, you can also read How to Translate a WordPress Website, which focuses specifically on translating content efficiently.
As you refine your multilingual setup, keep an eye on performance, backups and SEO so that each new language keeps your site fast, safe and discoverable.