Beginner’s Guide To WordPress Lead Generation
Learn how to turn your WordPress website into a simple, reliable lead generation system with forms, landing pages, offers, email follow-up, and tracking.

WordPress lead generation is the process of turning website visitors into contacts you can follow up with later. Instead of hoping people return on their own, you give them a clear reason to share their name, email address, phone number, or project details.
In this beginner’s guide, you will build a practical lead generation system using forms, landing pages, useful offers, email follow-up, and basic tracking. If your site is still new, start with a solid foundation by reviewing how to create a website with WordPress before adding advanced conversion features.
Prerequisites
You do not need to be a developer to generate leads with WordPress. However, you should have a working website, administrator access, and a clear idea of what action you want visitors to take.
- A self-hosted WordPress website or a WordPress plan that supports plugins.
- Administrator access to the WordPress dashboard.
- One primary offer, such as a quote request, consultation, checklist, demo, newsletter, or discount.
- A contact form or form plugin installed and ready to configure.
- An email address or email marketing service where new leads can be sent.
Step 1: Define Your Lead Generation Goal
Before you add forms or popups, decide what counts as a lead. A lead for a service business may be a quote request, while a lead for a blog may be an email subscriber who downloads a free guide.
Why this matters: your goal controls the form fields, page copy, call-to-action buttons, and follow-up sequence. Without one primary goal, your WordPress site can attract traffic but still produce very few useful contacts.
- Go to your WordPress dashboard and review your most important pages under Pages.
- Choose one main conversion goal for each important page.
- Write one simple call to action, such as Get a Free Quote, Book a Consultation, or Download the Checklist.
- Decide what information you truly need from the visitor to follow up.
Checkpoint: You should be able to describe your lead goal in one sentence: “I want visitors to submit a form so I can…” If that sentence is unclear, simplify the offer before building anything.
Troubleshooting: If you are not sure what goal to choose, start with the action closest to revenue. For most service websites, that is a quote request, consultation request, appointment booking, or phone inquiry.
Step 2: Add a Contact Form That Matches the Goal
A form is the core of most WordPress lead generation systems. It collects visitor details and sends them to you, your team, or your email marketing platform.
Why this matters: a form that asks too many questions can lower conversions, while a form that asks too little can produce low-quality leads. Start simple, then add fields only when they help you qualify the contact.
If you have not chosen a plugin yet, compare beginner-friendly options in this guide to the best contact form plugins for WordPress.
- In your dashboard, go to Plugins > Add New.
- Search for your preferred form plugin and click Install Now.
- Click Activate.
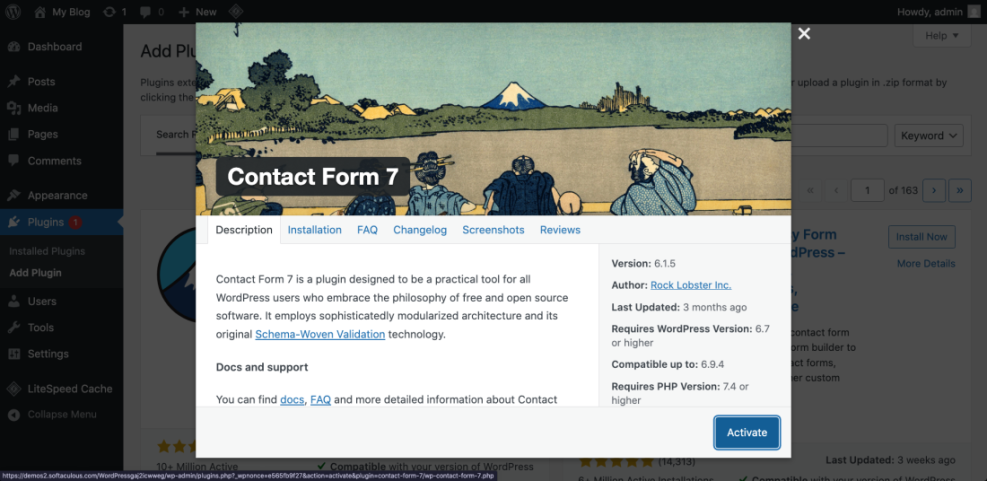
Checkpoint: Submit a test entry from the front end of your website. You should receive the notification email, and the submission should appear in the form plugin’s entries area if entry storage is enabled.
Troubleshooting: If form emails do not arrive, check your spam folder, verify the notification email address, and consider configuring SMTP through a reputable mail plugin. Many shared hosting servers are not reliable for default WordPress email delivery.
Step 3: Create a Lead Magnet Visitors Actually Want
A lead magnet is a useful offer visitors receive after sharing their contact information. Examples include checklists, templates, coupons, webinars, audits, calculators, email courses, or downloadable guides.
Why this matters: many visitors are not ready to buy during their first visit. A strong lead magnet gives them a lower-friction reason to start a relationship with your brand.
- Identify one problem your ideal visitor wants solved quickly.
- Create a simple resource that helps them make progress in 10 minutes or less.
- Give the resource a specific title, such as Website Launch Checklist instead of Free Guide.
- Add a short explanation above your form that tells visitors what they will receive.
- Redirect users to a thank-you page or send the resource by email after submission.
Checkpoint: Your offer should be specific enough that the visitor immediately understands the benefit. A good lead magnet feels like a practical shortcut, not a vague newsletter promise.
Troubleshooting: If people view the page but do not submit the form, rewrite the offer headline. Focus on the result, not the format. For example, “Get the 12-Point Homepage Audit Checklist” is stronger than “Download Our PDF.”
Step 4: Build a Focused Landing Page
A landing page is a page designed around one conversion goal. It removes unnecessary distractions and guides the visitor toward one action.
Why this matters: sending paid ads, social traffic, or email clicks to a busy homepage usually lowers conversions. A focused landing page gives the visitor a clear path from interest to action.
- Go to Pages > Add New.
- Add a clear headline that states the outcome visitors will get.
- Write a short paragraph explaining who the offer is for and why it is useful.
- Add bullet points that describe benefits, not just features.
- Place your form or call-to-action button near the top of the page.
- Add trust elements such as testimonials, guarantees, credentials, or simple proof points.
- Publish the page and test it on desktop and mobile.
Checkpoint: The page should have one primary button or form goal. Visitors should not need to scroll far to understand the offer or take action.
Troubleshooting: If the page feels cluttered, remove extra navigation-style links, unrelated widgets, long introductions, and competing calls to action. Keep the page focused on the promise, proof, and form.
Step 5: Connect Leads to Email Follow-Up
Capturing a lead is only the beginning. You need a follow-up process that confirms the submission, delivers the promised resource, and helps the visitor take the next step.
Why this matters: many leads go cold because no one follows up quickly. Even a simple welcome email can improve trust and make your site feel more professional.
For a deeper setup, follow this guide to email marketing in WordPress so your forms and campaigns work together.
- Choose an email marketing service or CRM that supports WordPress integrations.
- Connect your form plugin to the service using a built-in integration, add-on, or automation tool.
- Create a list or audience for the specific offer.
- Map the form fields, such as name and email, to the matching fields in your email platform.
- Create an automated confirmation email that explains what happens next.
- Submit a test lead and confirm the contact appears in the correct list.
Checkpoint: A test submission should trigger the correct email and appear in your email marketing dashboard. If you promised a download, the visitor should receive it immediately or land on a thank-you page with access.
Troubleshooting: If contacts are not syncing, check the API key, integration status, list selection, and field mapping. Also confirm whether your form plugin requires a paid add-on for the email service you chose.
Step 6: Track Conversions and Improve the Funnel
Once your form, landing page, and follow-up are working, track how many visitors become leads. This helps you improve based on real behavior instead of guessing.
Why this matters: traffic alone does not prove your site is working. A smaller number of qualified leads can be more valuable than a large number of visitors who never take action.
- Install or verify your analytics setup.
- Create a thank-you page for successful form submissions.
- Send users to that thank-you page after they submit the form.
- Track visits to the thank-you page as conversions in your analytics tool.
- Review your conversion rate by page, traffic source, and device type.
- Improve one element at a time, such as headline, button text, form length, or offer clarity.
Checkpoint: You should be able to answer three questions: which page gets the most leads, which traffic source sends the best leads, and which offer converts best.
Troubleshooting: If conversions are not showing in analytics, test the form in a private browser window, confirm the redirect works, and check whether caching or cookie settings are blocking the tracking script.
Step 7: Optimize for Trust, Speed, and Mobile Visitors
Lead generation depends on trust. Visitors are more likely to submit a form when your site loads quickly, looks credible, works on mobile, and explains how their information will be used.
Why this matters: slow pages, broken layouts, unclear privacy language, and confusing buttons create hesitation. Small trust improvements can increase form submissions without increasing traffic.
- Keep forms short and ask only for information you need.
- Add privacy reassurance near forms, such as “We will not sell your information.”
- Use clear button text, such as Get My Free Checklist instead of Submit.
- Test forms on mobile devices and small screens.
- Compress large images and avoid heavy scripts on landing pages.
- Add social proof, testimonials, reviews, case results, or recognizable client logos when appropriate.
Checkpoint: A mobile visitor should be able to understand the offer, fill out the form, and complete the submission without pinching, zooming, or hunting for the button.
Troubleshooting: If mobile leads are low, test the page on your own phone. Look for overlapping elements, small text, hidden buttons, slow-loading form scripts, and fields that are difficult to tap.
Your WordPress Lead System Is Ready to Grow
You now have the core parts of a WordPress lead generation system: a clear goal, a focused form, a useful offer, a landing page, follow-up emails, conversion tracking, and trust improvements.
Start with one offer and one landing page instead of trying to build a complex funnel immediately. After you collect real data, improve the page, test a stronger call to action, and expand your lead generation system across more posts, pages, and campaigns.
Further Reading
- Best Email Marketing Services
- Google Analytics WordPress Guide
- How to Add a Contact Form to WordPress
- How to Add a Popup on WordPress
Frequently Asked Questions
What is WordPress lead generation?
Why am I getting traffic but no leads?
Why are my WordPress form notifications not arriving?
What is the best lead generation strategy for beginners?
Is it safe to collect leads on WordPress?